Best File Type for Scanning Photos | The Complete Guide to High-Quality Results
The short answer: If you want the absolute highest quality for archiving, scan to TIFF. If you need a balance of quality and convenience for everyday use, scan to JPEG at the highest quality setting. If you want to share photos online quickly, JPEG at moderate quality is your best bet.
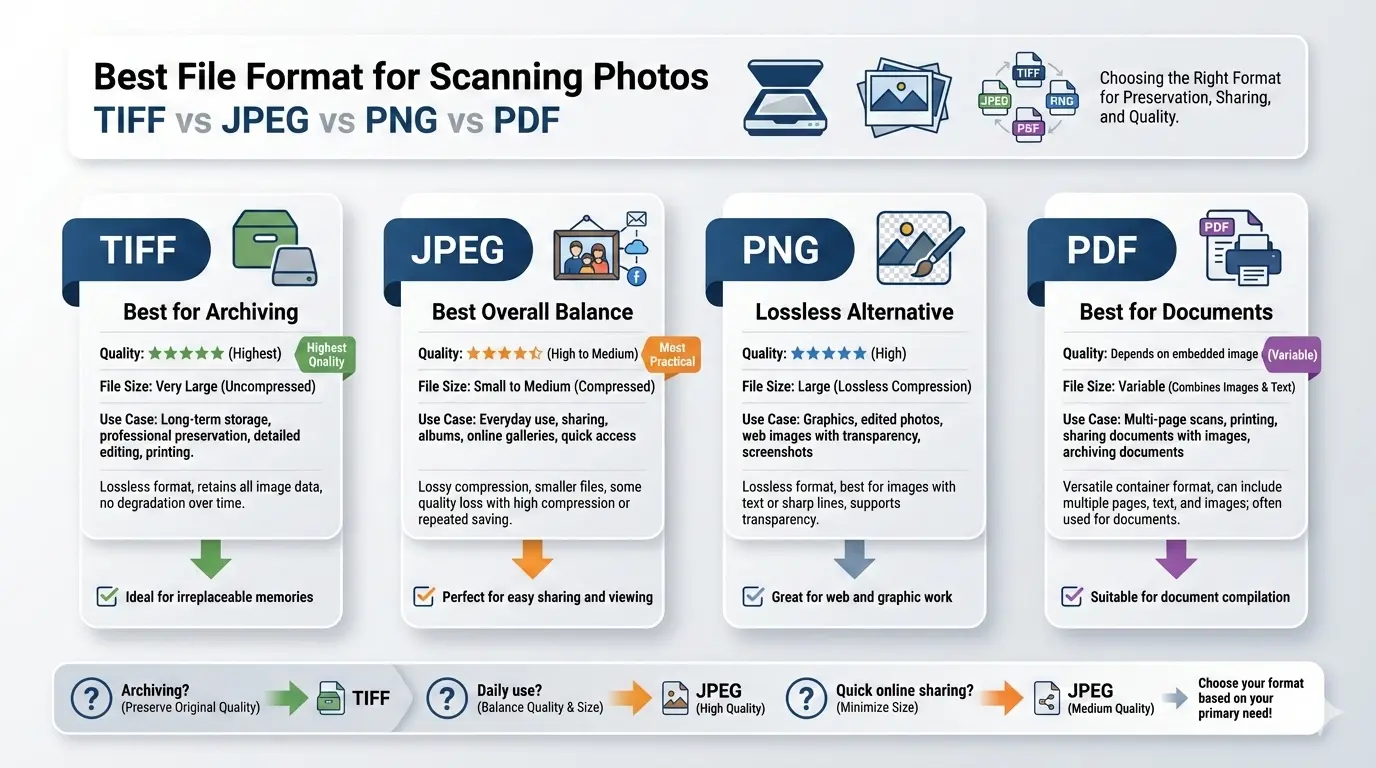
This guide compares the most common photo scanning formats—TIFF, JPEG, PNG, and PDF—across quality, file size, and real-world use. You will learn exactly which format to choose for long-term archiving, for sharing with family, or for professional work. By the end, you will never wonder about the best file type for scanning photos again.
This guide compares the most common photo scanning formats—TIFF, JPEG, PNG, and PDF—across quality, file size, and real-world use. You will learn exactly which format to choose for long-term archiving, for sharing with family, or for professional work. By the end, you will never wonder about the best file type for scanning photos again.
Scanning old family photos is a precious task. You want to preserve memories for future generations. But with so many file formats available, it is easy to feel confused. Should you use JPEG because it is small and convenient? Or TIFF because it preserves every detail? What about PNG? And when does PDF make sense?
Let us clear up the confusion once and for all.
Let us clear up the confusion once and for all.
Which photo scanning formats should you consider?
Before we dive into comparisons, here are the main formats used for photo scanning:
- TIFF (Tag Image File Format): The gold standard for archiving. Lossless, supports high bit depths, and preserves every pixel exactly as scanned.
- JPEG (Joint Photographic Experts Group): The most common format for photos. Uses lossy compression to create small files. Quality depends on the compression level you choose.
- PNG (Portable Network Graphics): Lossless format popular for graphics and text. Also works for photos but creates larger files than JPEG.
- PDF (Portable Document Format): Useful when scanning multiple photos into one file, like a photo album or collection.
Is it better to scan photos as JPEG or PDF?
For individual photos, JPEG is better than PDF. JPEG is designed specifically for photographs. It preserves color gradations well and creates reasonably small files.
PDF is useful when you want to group multiple photos together—for example, scanning an entire photo album or creating a digital portfolio. PDF keeps all images in one file, which is easier to organize and share.
The rule: Use JPEG for individual photos. Use PDF for collections or albums.
PDF is useful when you want to group multiple photos together—for example, scanning an entire photo album or creating a digital portfolio. PDF keeps all images in one file, which is easier to organize and share.
The rule: Use JPEG for individual photos. Use PDF for collections or albums.
Should I scan to PNG or JPEG?
For photographs, JPEG is usually the better choice. Here is why:
- JPEG compresses photos much more efficiently than PNG. A high-quality JPEG can be 5–10 times smaller than a PNG with almost no visible difference.
- PNG is lossless, which sounds good, but for photos the lossless advantage is minimal. The human eye cannot see the difference between a well-compressed JPEG and the original.
- PNG files are huge. A single photo scanned as PNG could be 20–50 MB, while the same photo as high-quality JPEG might be 2–5 MB.
When PNG makes sense: If your photo has text, sharp lines, or a logo, PNG is better. For most photographs, JPEG is the practical choice.
Is it better to scan in TIFF or JPEG?
This is the most important question. The answer depends on your goal:
The professional approach: Scan once to TIFF for your archive. Then create JPEG copies for sharing, email, and everyday use. This gives you the best of both worlds.
Archivist's rule: Scan to TIFF, store forever. Use JPEGs for everything else.
Which is better, JPG or PNG or TIFF?
Here is the honest comparison:
- TIFF is the quality king. It preserves every detail, supports 16-bit color, and is the standard for professional archiving. But files are huge.
- JPEG is the practical choice. It balances quality and file size perfectly for most uses. At high quality settings, it looks identical to the original.
- PNG is the specialist. It is lossless like TIFF but compresses differently. For photos, PNG files are smaller than TIFF but much larger than JPEG. Best for graphics, not photos.
The winner depends on your needs:
Understanding lossless vs. lossy for photo scanning
This is the core concept you need to understand:
- Lossless formats (TIFF, PNG): Preserve every single pixel exactly as scanned. No quality is ever lost. Files are large.
- Lossy formats (JPEG): Discard some image data to save space. At high quality settings, the loss is invisible to the human eye. Files are much smaller.
For photo scanning, here is the truth: at high quality settings (90-100%), JPEG is visually identical to the original. The loss is there mathematically, but you cannot see it. Only if you zoom in 400% and compare pixel by pixel would you notice differences.
For 99% of users, high-quality JPEG is perfectly acceptable. For archivists, museums, and professionals, TIFF is the standard because it guarantees perfect preservation forever.
For 99% of users, high-quality JPEG is perfectly acceptable. For archivists, museums, and professionals, TIFF is the standard because it guarantees perfect preservation forever.
Best format for long-term photo archiving
For long-term archiving of precious family photos, TIFF is the best choice. Here is why:
- TIFF is an open, non-proprietary format. It will be readable decades from now.
- It supports embedded metadata. You can store information about the photo, date, and people in the file itself.
- It is lossless. Your great-grandchildren will see exactly what you scanned.
- It supports high bit depths. If you scan at 16-bit, you preserve more tonal information than standard 8-bit JPEGs.
Recommended settings for archiving:
- Format: TIFF
- Resolution: 600 DPI for small photos, 300 DPI for large photos
- Color: 24-bit color or 16-bit grayscale
- Compression: LZW or ZIP (lossless, reduces file size)
Best format for sharing photos online
For email, social media, and online sharing, JPEG is the clear winner. It creates small files that upload quickly and display instantly.
Recommended settings for sharing:
Recommended settings for sharing:
- Format: JPEG
- Resolution: 150-200 DPI (or resize to 1200-2000 pixels on the long side)
- Quality: 80-85% (excellent quality, very small files)
For email attachments, keep files under 5 MB. Most email services have size limits, and smaller files are more considerate to recipients.
Best format for printing scanned photos
For printing, you need high resolution and good quality. Both TIFF and high-quality JPEG work well.
- For professional printing: Use TIFF at 300 DPI. Print shops prefer TIFF for its uncompromising quality.
- For home printing: High-quality JPEG at 300 DPI is perfectly fine. You will not see the difference.
Pro tip: When printing, make sure your file is at least 240 DPI at the size you want to print. A 4x6 inch photo should be at least 960 x 1440 pixels.
What about PDF for photo albums?
PDF is excellent for creating digital photo albums or collections. You can combine multiple scanned photos into one file, add text, and arrange pages.
When to use PDF for photos:
When to use PDF for photos:
- Creating a family photo album to share digitally
- Combining photos with text descriptions
- Sending multiple photos as one attachment
- Archiving a collection of related photos
For individual photos, stick with TIFF or JPEG. For collections, PDF is a great choice.
Recommended scanning settings by format
Color depth | 8-bit vs. 16-bit scanning
Another important factor is color depth:
- 8-bit per channel (24-bit color): Standard for most uses. 16.7 million colors, more than the human eye can distinguish.
- 16-bit per channel (48-bit color): Professional grade. Preserves more tonal information for editing. File sizes are much larger.
Recommendation: For archiving precious photos, scan in 16-bit if your scanner supports it and save as TIFF. For everyday use, 8-bit is perfectly fine.
The two-step scanning workflow professionals use
Here is the workflow recommended by professional archivists and photographers:
- Scan to TIFF master 📌 Scan your photo at 300-600 DPI, 16-bit if possible. Save as TIFF with LZW compression. This is your digital negative. Store it safely, back it up, never modify it.
- Create JPEG derivatives 📌 From your TIFF master, create JPEG copies for everyday use. Resize as needed, adjust quality, and save. If you lose or damage the JPEG, you can always create another from the master.
This approach gives you the best of both worlds: perfect preservation and convenient access.
How to convert between photo formats
Sometimes you need to convert your scanned photos from one format to another. For example, you might have TIFF archives but need JPEGs for email.
Use a best free image converter online no signup to convert quickly and safely. You can:
Use a best free image converter online no signup to convert quickly and safely. You can:
- Convert TIFF to JPEG for sharing
- Convert PNG to JPEG for smaller files
- Combine multiple photos into a PDF album
- Adjust quality settings to control file size
Always keep your original master files. Convert copies as needed.
Common photo scanning mistakes to avoid
Avoid these common errors when scanning photos:
- Scanning at too low resolution 📌 150 DPI might look okay on screen but will pixelate when printed. Use 300 DPI as a minimum.
- Using JPEG for archiving 📌 If you ever need to edit and re-save, JPEG loses quality each time. Use TIFF for masters.
- Not cleaning photos before scanning 📌 Dust and fingerprints show up in scans. Clean gently with a soft cloth.
- Ignoring color correction 📌 Old photos fade. Use your scanner's software to restore colors if needed.
- Not naming files properly 📌 "Scan001.tif" is useless. Use descriptive names like "Grandma_1955_wedding.tif".
Summary - Best file type for scanning photos
For long-term archiving: TIFF at 300-600 DPI, with LZW compression. This preserves every detail for future generations.
For printing and general use: High-quality JPEG at 300 DPI, quality 90-100%. Excellent quality with manageable file sizes.
For email and online sharing: JPEG at 150-200 DPI, quality 80-85%. Small files that look great on screens.
For photos with text or graphics: PNG at 300 DPI. Preserves sharp edges and text perfectly.
For photo albums and collections: PDF, combining multiple images into one organized file.
Remember: Your choice depends on your goal. For a deeper dive into document scanning, read which document scanning format is best. For email-specific advice, see best format to scan documents for email.
The bottom line: Scan once to TIFF for your archive. Create JPEG copies for everyday use. This simple workflow ensures your precious memories are preserved forever and easy to share today.
Powerful & Easy to Use
Professional Image Conversion — Simplified
Whether you're optimizing images for the web or preparing high-quality files for archiving, Image Converter 24 gives you full control over your formats. Convert TIFF, PNG, JPG, WebP and more instantly — securely and directly in your browser.
Start Using Image Converter 24