TIFF or JPEG for Scanning Photos - The Smart Choice Guide
Use TIFF for archiving and preserving precious photos. Use JPEG for everyday sharing and saving space. If you are scanning family photos you want to keep forever, choose TIFF. If you need to email photos or post them online, choose JPEG at high quality.
This guide helps you decide between TIFF or JPEG for scanning photos based on your real needs. You will learn the difference in quality, file size, and when each format makes the most sense.
Scanning old photos is a precious task. You want to preserve memories for yourself, your family, and future generations. But the choice of format can be confusing. TIFF offers maximum quality. JPEG offers smaller files. Which one is right for you?
Let us break it down simply and honestly.
Let us break it down simply and honestly.
Is TIFF or JPEG better for scanning documents?
For documents, PDF is usually best. But if you are choosing between TIFF and JPEG for documents, here is the answer:
For text documents: TIFF is better. It preserves sharp text and fine details without artifacts. JPEG can make text look blurry.
For documents with photos: Either can work. TIFF gives you lossless quality, while JPEG saves space.
For a complete guide on document scanning, read which document scanning format is best.
Is JPEG or TIFF better for photos?
This depends entirely on your goal:
What is the best format for scanning photos?
The best format depends on what you plan to do with the scanned photos:
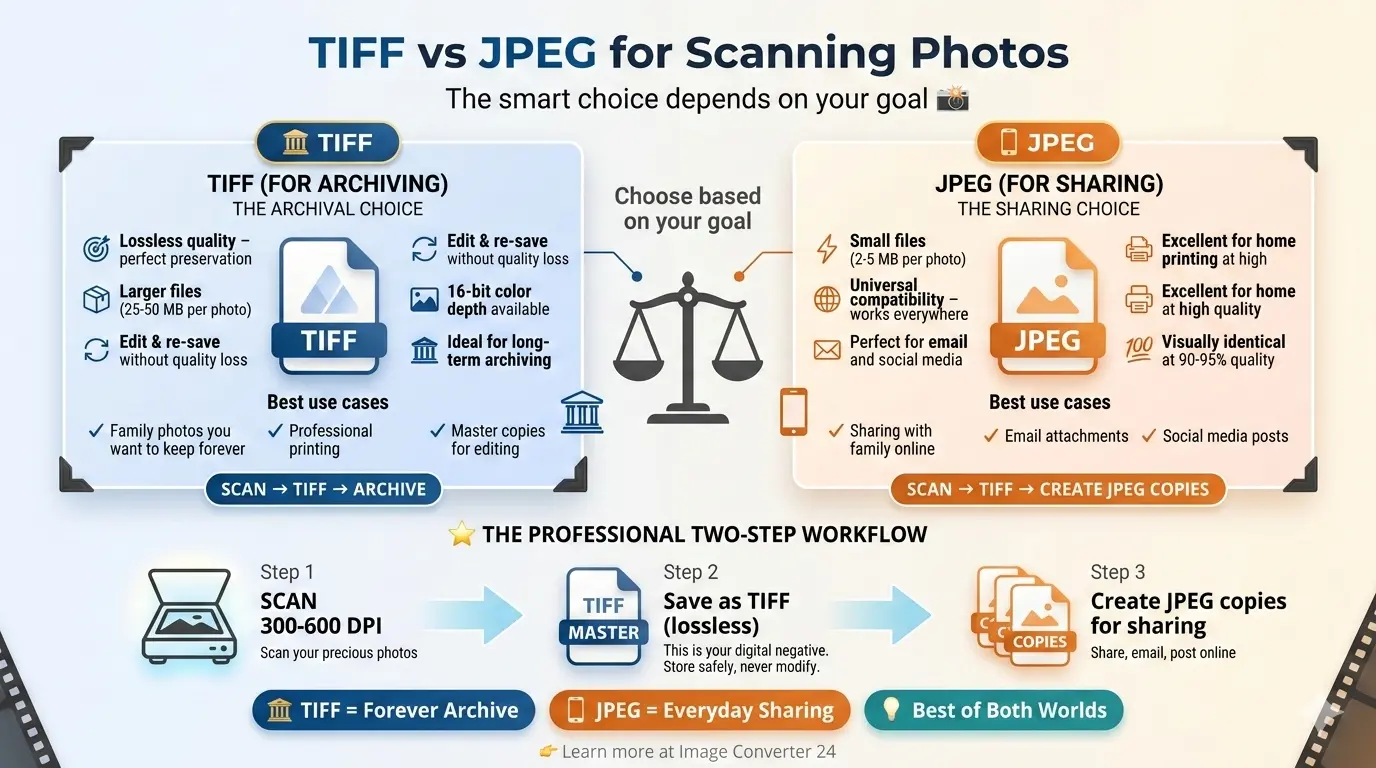
- For archiving family history 📌 TIFF is best. Scan at 300-600 DPI and save as TIFF. This creates a digital master that will last forever.
- For sharing with family 📌 JPEG is best. Create copies from your TIFF master at reasonable quality (90%) for easy sharing.
- For printing enlargements 📌 TIFF at 600 DPI gives you maximum flexibility for large prints.
- For social media 📌 JPEG at 150 DPI and reduced size works perfectly.
The professional approach: Scan once to TIFF for your archive. Create JPEG copies for everyday use. This gives you the best of both worlds.
What resolution is best for scanning photos?
Resolution is measured in DPI (dots per inch). Higher DPI means more detail, but also much larger files.
- 150 DPI: Good for quick previews and social media. Text may be slightly soft.
- 300 DPI: The standard for most scanning. Excellent quality for prints up to 8x10 inches. Balanced file size.
- 600 DPI: High quality for enlargements or photos with fine details. Files are large.
- 1200 DPI+: For professional archiving of very small originals (like slides or negatives). Overkill for most photos.
Recommendation: For most family photos, scan at 300 DPI. This gives you excellent quality without wasting storage space.
TIFF vs JPEG: Head-to-head comparison for photos
| Feature | TIFF | JPEG |
|---|---|---|
| Compression | Lossless (LZW, ZIP) or uncompressed | Lossy (discards data to save space) |
| Quality | Perfect, pixel-for-pixel preservation | Excellent at high settings, but some loss |
| File size (300 DPI photo) | 25-50 MB | 2-5 MB |
| Editing flexibility | Excellent – no quality loss on re-save | Poor – each save degrades quality |
| Color depth | 8-bit, 16-bit, even 32-bit | 8-bit only |
| Compatibility | Excellent for software, not for web | Universal – everything opens JPEG |
| Best use | Archiving, professional printing | Sharing, web, email, casual use |
The two-step workflow professionals use
Here is the workflow recommended by archivists and photographers:
- Scan to TIFF master 📌 Scan your photo at 300-600 DPI, 16-bit if possible. Save as TIFF with LZW compression. This is your digital negative. Store it safely, back it up, never modify it.
- Create JPEG derivatives 📌 From your TIFF master, create JPEG copies for everyday use. Resize as needed, adjust quality, and save. If you lose or damage the JPEG, you can always create another from the master.
This approach gives you the best of both worlds: perfect preservation and convenient access.
Why TIFF is the archiving champion
TIFF has several features that make it ideal for archiving precious photos:
- Lossless compression: You can save and re-save without ever losing quality.
- High bit depth: 16-bit TIFF preserves more tonal information than 8-bit JPEG.
- Metadata support: TIFF can store descriptions, dates, and copyright information inside the file.
- Non-proprietary: TIFF is an open format that will be readable decades from now.
- Widely supported: Every professional software reads TIFF.
For a comparison with another lossless format, read BMP vs TIFF quality.
Why JPEG is perfect for sharing
JPEG dominates for sharing because:
- Small files: A high-quality JPEG is 5-10 times smaller than TIFF.
- Universal compatibility: Every device, every app, every website opens JPEG.
- Good enough quality: At high settings, JPEG is visually identical to the original.
- Easy to email: Small files send quickly and stay within size limits.
For email-specific advice, see best format to scan documents for email.
When to choose TIFF for photos
Choose TIFF when:
- You are scanning irreplaceable family photos for long-term preservation
- You plan to edit the photos later and want to maintain maximum quality
- You need professional printing at large sizes
- You want to archive photos for future generations
- Storage space is not a concern
When to choose JPEG for photos
Choose JPEG when:
- You want to share photos online or via email
- You are creating a digital photo album to view on screens
- You need to save storage space
- You are making prints at home (at high quality settings)
- You want universal compatibility with all devices
Real-world file size comparison
Let us look at real numbers for a 4x6 inch photo scanned at 300 DPI:
The TIFF file is 5-10 times larger than JPEG. That adds up quickly if you are scanning hundreds of photos.
What about scanning documents vs photos?
For documents, the choice is different. If you are scanning text documents, PDF is usually best. For a complete guide, read should I scan documents as JPEG or PDF.
Common questions about scanning photos
Can I convert TIFF to JPEG later?
Yes, absolutely. This is the recommended workflow. Keep your TIFF master, and create JPEG copies whenever you need them.
Does JPEG lose quality over time?
No. A JPEG file does not degrade just by sitting on a hard drive. It only loses quality when you open, edit, and re-save it. If you store JPEGs without editing, they stay the same forever.
Is TIFF worth the extra space?
For irreplaceable photos, yes. Storage is cheap compared to the cost of losing memories. A 10 TB hard drive can hold hundreds of thousands of TIFF photos.
What DPI should I use for photos I want to enlarge?
For enlargements, scan at 600 DPI. This gives you enough detail to print at larger sizes without pixelation.
Important note: Always keep a master copy of your scans in a lossless format (TIFF) before doing any editing. If you edit a JPEG and save it, you lose quality permanently. With a TIFF master, you can always start fresh.
The verdict - TIFF or JPEG for scanning photos
For archiving and preservation: TIFF is the clear winner. It preserves every detail for future generations. Scan at 300-600 DPI, save as TIFF with LZW compression, and store safely.
For sharing and everyday use: JPEG is the practical choice. Create high-quality JPEG copies (90-95% quality) from your TIFF masters. They look almost identical and are easy to share.
The smart approach: Use both. TIFF for your archive, JPEG for your everyday needs. This gives you perfect preservation and convenient access.
How to convert between TIFF and JPEG
If you already have scans in one format and need the other, conversion is easy:
- TIFF to JPEG: Use a converter to create smaller, shareable files. Keep your TIFF master.
- JPEG to TIFF: This does not improve quality. The JPEG artifacts remain. Only useful for consistency.
For a detailed guide on photo scanning, read best file type for scanning photos for high quality.
Summary: TIFF is best for archiving photos you want to preserve forever. JPEG is best for sharing and everyday use. Scan at 300 DPI for most photos, 600 DPI for enlargements. Use the two-step workflow: scan to TIFF master, then create JPEG copies. This gives you perfect quality and practical convenience.